I thought I would show you how I spent my last 30 minutes. I had to get this Donnelly rearview mirror separated from its mounting bracket. In theory, the spring-latched bracket should have been a snap to disengage, but I spent a long time googling the issue and poking at it before I discovered the trick. I even looked up the original patent sketches, patent number 4936533, and that proved even more confusing.
So to keep you from spending the same amount of time trying to disassemble a rear view mirror, I’m going to show you the trick right now.
The secret is to ignore the spring latch at the front, that’s just a decoy. You’re actually aiming for the spring at the back. Slip a small screwdriver or stiff rod through the access hole, and press it against the back spring while putting pressure on the mount to slide forward.
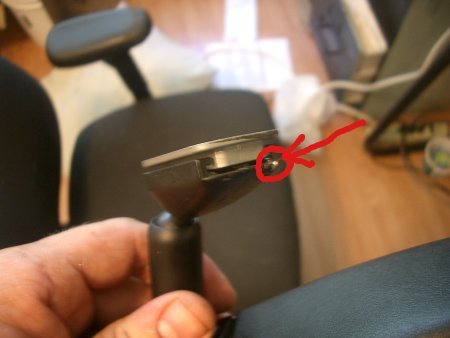
The arrow points at the access hole.
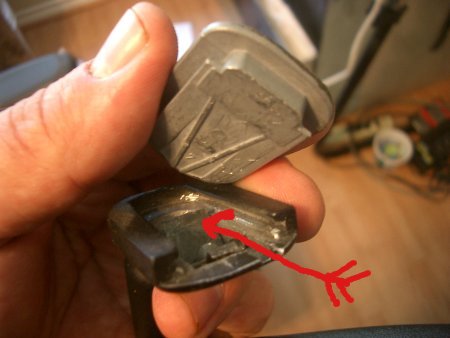
Here’s what it looks like inside. The arrow is the path your screwdriver will have to travel to unlatch the spring.
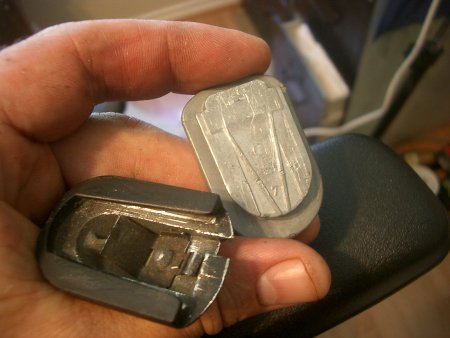
And one more photo so you can get an idea what’s in there.

Thx great help worked
Thanks much dude, I wish I had looked this up earlier!
This was greatly helpful. I wasn’t looking forward to holding the whole mirror assembly in place in order to reattach my mirror to my windshield. Thanks a million! To anyone still struggling: I held the mirror bracket post in my left hand, mirror down, with my left thumb on the silver mounting plate. I used a small Allen key in my other hand and levered slightly against the edge of the silver mounting plate (in order to provide sufficient force on the spring, pushing it down and away from the mounting plate) while pushing the mounting plate toward the opening in the bracket with my thumb. It won’t feel particularly springy, but you are aiming for the metal pad the author’s red arrow points to in the second image. You need a fair amount of pressure on the pad and the plate should start to loosen as you go. Good luck!
Thanks for this extra bit of advice!
Thanks a million and I mean that!!!
You are a genius, thanks
Hey I know its a bit old post. But do you still have the images. I am having the same issue and cannot find anything in google. Thanks for help.
Benny, sorry about the lack of pictures, not sure what happened there. They’ve been re-uploaded. Hope they help!
man. You are freaking awesome. Thank you so much for putting this out here. It was a tremendous help and save me a lot of time I really appreciate it.
Thank you sir!!!!!!! I tried mounting the whole mirror, forget about it, lol. I saw that whole, wasn’t sure. What a goofy design.
Matthew: Thanks for taking the time to post this. I am glad that I found it. It was greatly appreciated and worked like a charm.
Worked great that last photo helped me the most…Thanks
Great advice.I labored with this thing for a long time.
First to get it off the wiring to the map lights and then toget the mount apart. I saw Donally on the mirror and looked that up. It worked!!!!!!!!!
Halleluia! You helped! Not even the car mechanic who lives next door could figure it out. This one is a little different but it still is a Donelly. It needed to be pryed apart as you described then turned a quarter turn.
Thanks so much worked I used an allen like u said and pushed with my thumb it wouldnt move so I used a small screwdriver to not the thumb to help pry it to slide out. Thanks again
I believe I have a different model than the one you describe.
Both of the access holes are in the center rather than the side.The end piece opposite to the tapered end of the button has what looks like a plug in the center.
Model # I E8 011083 ( The E8 is within a circle)
Any Ideas?
I dunno, floorguy. Does it have the same patent number? If it’s a similar design the trick will be taking something long and thin and poking it around in the bracket.
Thanks so much. This thing is worse than a Rubik’s cube. The guy that invented this is laughing his butt off every day.
I had already spent much more than 30 minutes – I went to the original patent too. I was stuck until I found this. Thanks a million.
This so stressed me out, even dropped mirror and broke it, got replacement and finally found this info
The last time I replaced rear view mirrors was literally in the 1980s.
So now, when I so wanted to remove the mirror from the 1998 Nissan Frontier that I’ve been driving for almost a year … so as to install a cling tint strip around the mount, instead of having to cut a slit through the top section of the film … my memory wasn’t serving well, and I wouldn’t have known whether my past experiences were with a compatible mechanism.
So, I tried gently fiddling with all sorts of hand tools in that access slot. Hex (Allen) wrenches and various screwdrivers; since I presumed, incorrectly, that I was trying to engage with a set screw.
I looked up the patent number on my beat up old cell phone, and fortunately found this post. Thanks so much Matt !!
My only comment to others is to be sure you come with a slotted screwdriver, which is lengthy enough i.e. several inches, and not a screwdriver bit that fits into a fatter tool. It’s because you want the screwdriver to approach the slot at a very shallow angle, with the tool aligned low against the windshield.
Thanks again … Larry
Thanks a ton (or two)!! For once the interweb worked the way it was supposed to. All I searched with geegle was “patent #4,936,533” and your article was the only one that came up. Saved me a TON of time.
Thanks. You finally helped me convince my dad that the internet can be useful.
Matt, you are a hero and a very practical guy.
didn’t have a small screwdriver nor allen’s wrench. Tried a universal door knob key with flat end- right size for entry and length to hold down notch. Mounting plate easily travelled over the metal key. Photos very helpful for this old woman.
I have a 2005 F150 XLT. Unfortunately this model does not have springs! It has a clip on the base of the housing that you have to pop off. Then you glue the metal piece aka button back to windshield, allow to dry then hold mirror back over button then push clip back on and your set.
I can’t thank you enough!!!!!!!!! After fighting with this for way too long it took me one second after following your instructions You are the best!
Foolishly snapped off the entire module whilst adjusting it and tried to Richard Dean Anderson it back on with sad results
Was much easier to attach the jig without the mirror and my homemade clamp
Thanks champ!
Thank you – mine broke and fell off though. Made it easy to remove. My problem, however, is I need a NEW mounting bracket (the piece that goes on the glass) and cannot find one. Can you offer any suggestions, please?! Desperate! I can’t see out my rear window, the mirror is dangling by the cord :/
Did it break off from the glass leaving anything behind, or is there just smooth glass? Either way you could probably just buy a whole new rearview mirror from an auto-parts store or Amazon and just epoxy it on.
Saved me so much time. Thanks.
Mechanics at both Pep Boys and Walmart in Fishers, IN did not know how to remove the Donnelly rear-view mirror mounting bracket!!! Your extremely helpful instructions saved me from having to purchase a new replacement rear-view mirror with a set screw for my 1995 Mercury Sable.
Thankyou Thankyou Thank you…:)
Thank u so much
Thanks. This saved two old farts a lot of sweat and headache. We found the perfect tool for removal from mirror. A basic coat hanger.
No spring on mine, but the method described still got the bracket apart. Thanks a lot for figuring this out. I’m sure I would have broken something trying to figure this out on my own!
Thanks mate this was great, I tried pushing in straight for ages but when i found this page (via the patent number) and pushed down and away (to the left while looking at the base of the button) it worked a treat.
My bracket is guled to the mirror how do i remove it
I don’t know. That sounds like a problem that careful drilling and sawing might fix?
Thanks, Best info on the web.
thank you so much, saved me tearing my hair out in frustration!
In case anyone is wondering the part number for the button bracket, I’ve found it:
Mazda part #BC1C-69-240
A company called “C.R. Laurence” also makes this exact button, part #AGC7 CRL Honda (U.S.) Rear View Mirror Bracket
Also available on Amazon for pretty cheap:
https://www.amazon.com/gp/product/B001G0ZVJS
Thank You!!
Thankyou sir,
Googled Donnelly mirrors and found this page
Thanks! Your advice–and especially your photographs–helped tremendously!
Wow, considering how long this post has been up, I can’t believe it is still the only one to have actually helped. Thank you so very much! I wish I would have found this before the project became such a headache. Much appreciated.
That is awesome, Ruth! Those are tricky mirrors, glad this helped!
Getting it off is easy – do you have a how to put it back on?!
No idea!
Almost ten years and you’re still saving people’s bacon. Thanks!
And after all this time, it’s still the most popular thing I’ve ever wrote.
Thank you for the Help Buddy!!!! I appreciate it!!!!
Seriously, THANK YOU!!! Had to glue my Donnelly rearview back on today — almost ten years after you posted this — and within minutes I knew I was going to break something so… I Googled its 23g.2 part number and your post was the first to appear. Your photos saved me LOTS of trouble! Less than 10 seconds later, my rearview button was free!!! Thank you, thank you, thank you!
One simple blog post, and you have saved so many of us from breaking our S**T out of frustration. Your simple photos and explanation were gold. Thank you!
And yet all the blog posts I did about hotdogs have done no one any good. Glad this post is still helping. Best of luck with the rest of the car!
Thank you very much!
Thank you so much for the post! I had given up and was shopping for an entire new mirror/bracket, when I gave a random shot on Google with the patent number on the mirror. You’re awesome! 🙂
Thank you Matt ! I spent one day long after finding your instruction. Kudos for you !
If we hadn’t found this information my husband would have pried it straight up and broken the plastic. Thank you so much – this is not something we would have figured out on our own.
Thanks this was invaluable!